Embroidery is an integral part of Ukrainian clothing and household items, and has long been a decoration, a real brand that arouses interest all over the world. It has passed through the centuries and still has not lost its relevance. It is the most beloved type of folk art.
There are many types and techniques of embroidery, each of which is individual, differs in style of execution and purpose. One of the oldest, most interesting and simplest methods of embroidery is netting, which has long been a fairly well-known and popular type of needlework in different regions of Ukraine. Openwork and very sophisticated embroidery looks very elegant, and the products on which it was made look festive and elegant.

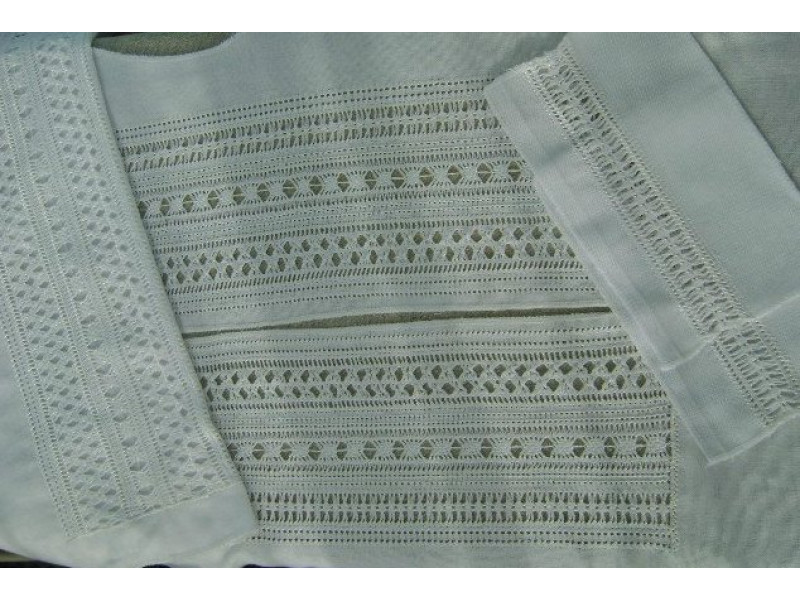
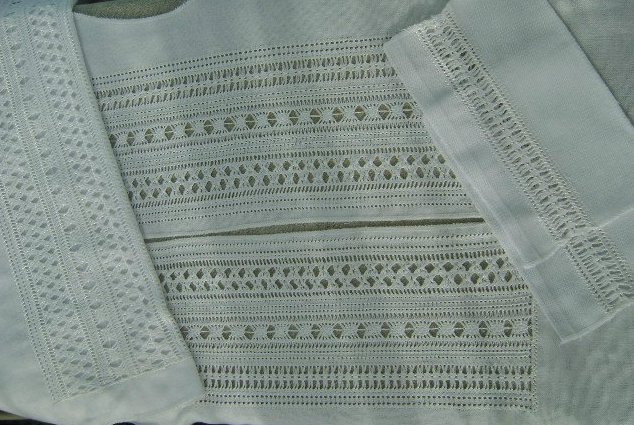
The photo shows the work of Lesya Demchuk
Lace is used to decorate shirts, both women's and men's, skirts, children's clothing, tablecloths, towels, napkins, and bed linen. It is used to connect different parts of clothing instead of seams. Lace is sewn mainly with white or light colored threads (gray, pink, blue), if the fabric is white, and close to the tone, if the fabric is colored.
Today, embroidery has not only returned to our lives, becoming a fashionable decoration, but also has found its fans among people of any age and gender. And many are trying to master the interesting technique of sewing lace. Moreover, things decorated with lace are always relevant.
If you are a patient, diligent, and neat person, your crochet will definitely turn out beautiful.
Types of laces
Lace is made on fabric, from which threads are usually pulled in one direction (horizontal or vertical), and the unpulled threads are combined in various ways into bundles that create patterns. Laces are made both narrow and simple, and very complex, which turns them into almost fine lace.
Depending on the type of lace being embroidered, different types are distinguished by technique, size, and complexity of execution.
 |
|One-sided and two-sided mesh
Single-sided embroidery is a strip of fabric with stretched threads that are worked on one side only. This type of embroidery is usually used to hem the edges of products.
Double-sided - strips of fabric on which threads are stretched, processed from two parallel sides. There are two types: columns (embroidered the same on both sides) and split (sewn in a checkerboard pattern). It can also be sewn with the rearrangement of columns, which intertwine with each other in different variations. Can be used as an independent decoration of the product, or in combination with other laces.
Simple and complex netting
Simple netting is performed using one technique and is taken as the basis for all other types of netting.
Compound embroidery is embroidered on two or more strips of fabric with stretched threads, and between them is fabric with unstretched threads. Compound embroidery can combine several types of it.
uh4> Narrow and wide netting
Narrow is a simple netting up to two centimeters wide, for embroidery of which three to five threads are pulled out.
Wide ones can be up to three centimeters wide. They are usually made on large hoops or frames made of four rails.
Preparatory stage
And you should start, of course, by choosing the product that you want to decorate with lace, and the fabric from which you will make this product. Since lace is made by pulling out the threads, you should choose a fabric from which they can be easily pulled out. Fabrics with intricate weaving are not suitable for lace. It is best to choose smooth fabrics, such as linen, cambric, cotton, silk. You can also learn on canvas or burlap.

Depending on the density of the selected fabric, you need to choose the threads. Our great-grandmothers used threads that were pulled from the canvas on which they embroidered. Modern needlewomen use cotton threads, iris, linen, silk or floss for netting (floss, made of two, three or four threads, depending on the thickness of the canvas, is best suited). They also sew with ordinary threads on spools (for thin canvases, threads with high numbers 60-80 are taken, for thicker ones - with medium ones). The color of the threads can be chosen to your taste, but the pattern looks most impressive when the embroidery is close in color to the fabric.
You also need a tapestry needle with a large eye and a blunt tip, small but sharp scissors for cutting threads on the fabric, and a hoop, especially if you are going to make wide lacework.
Getting started
Before pulling the threads out of the canvas for the hemstitch, you need to mark the place where it will be placed and its size in width and length. The threads that need to be pulled out, cut, turn the ends inside out and secure.
"Stitches" are made in two ways - with rolling pins or by cutting and restoring fabric threads.
Rolling pins are columns that are embroidered in a width of three to five threads, through one thread of the canvas, to the entire height of the netting. Both sides of the netting are sewn with rolling pins. The threads, secured with rolling pins and carefully trimmed, are pulled out, and the cut ends are bent towards the main fabric with a needle.

To secure the threads by cutting and repairing, cut two threads in the middle of the place where the hem will be. Using a needle, pull one of them 2.5 centimeters further than your planned edge of the hem, bringing the thread to the wrong side. The second thread is pulled to the edge of the hem, put on the needle and passed through the hole from the first thread and further along its path. The remaining threads must be carefully cut.
The net is always embroidered from left to right, holding the work on the index finger. The middle and thumb of the left hand are used to pull the vertical threads of the net. Knots on the working thread are not used, the end of the thread is pulled into the net.
When the working thread runs out and the embroidery is still in progress, it is secured by bringing it to the back and passing it under the stitches of the netting.
Lace embroidery techniques
There are many patterns of net embroidery. Differences in the technique and even in the names are associated with the region in which they became widespread, with the craftsmen who made their own adjustments to existing types of embroidery, enriching them with new types and techniques.
The most common and easy-to-perform net embroidery techniques are twigs, flooring, columns, buckwheat, lyakhivka, spider, goat, bug, punk, etc. But they are all based on the simplest technique - "single twig" (tassel).
"Single twig"
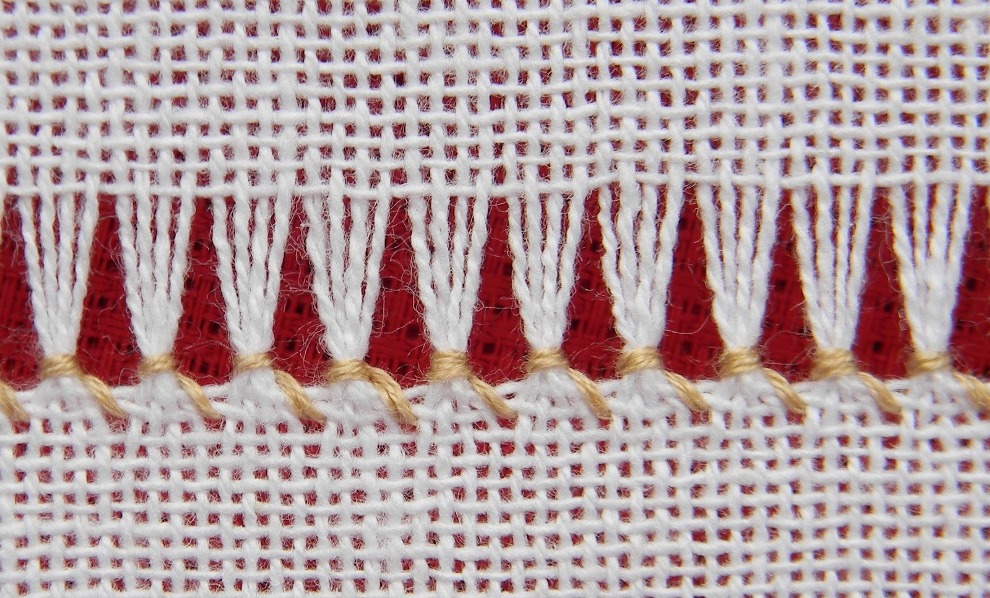
In this type of embroidery, only one side of the netting is sewn, from which threads up to five millimeters wide are pulled out. A needle with a fixed working thread is used to pick up three to five threads (no more than three millimeters) on the canvas, under which it is threaded. Then the needle is inserted to the right of the previously picked up threads and brought out to the front side diagonally through several threads taken together from below the working thread. The picked up threads are tightened. The following columns are made in the same way. It is necessary to ensure that in each stitch the number of pulled threads, its length and slope are the same throughout the netting, which will make the pattern neat.
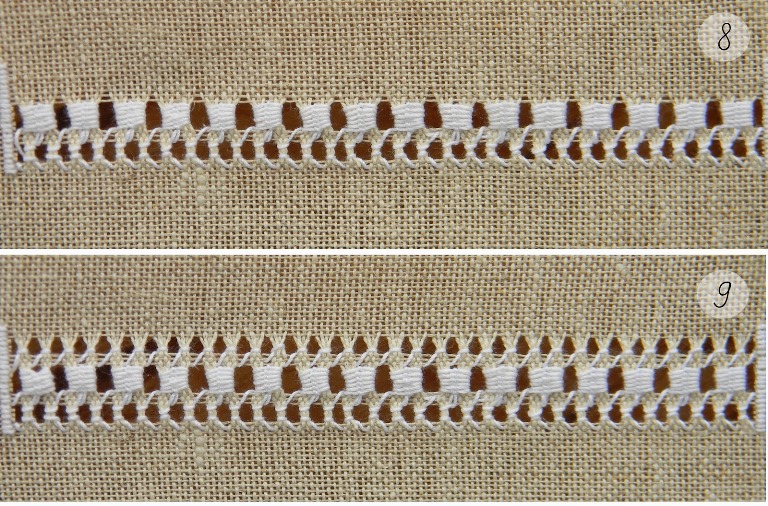
"Double twig" (double-sided, regular, ladder)
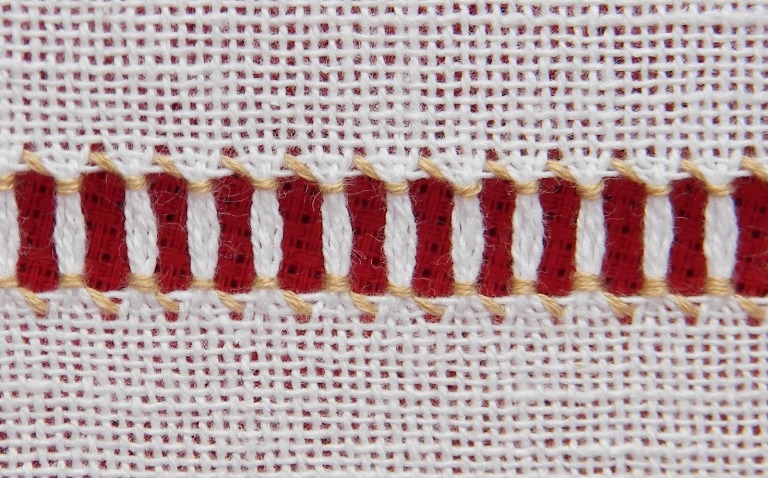
This is a single stitch that is worked on both sides of the netting. After one side is embroidered, the piece is turned over and embroidered on the other side, creating vertical stitches. This type of netting is sewn as a base for other, more complex patterns.
"Split twig" (forked, lattice, worm, zigzag, snake)
A network in which the rods are divided in half at the bottom. They are made with an even number of threads in the rods. After completing a one-sided rod, the work is turned, as for a double one, but half of the threads of one rod are combined with half of the threads of the other. It is used as a complement to the ornament in complex ornaments and for hemming things.
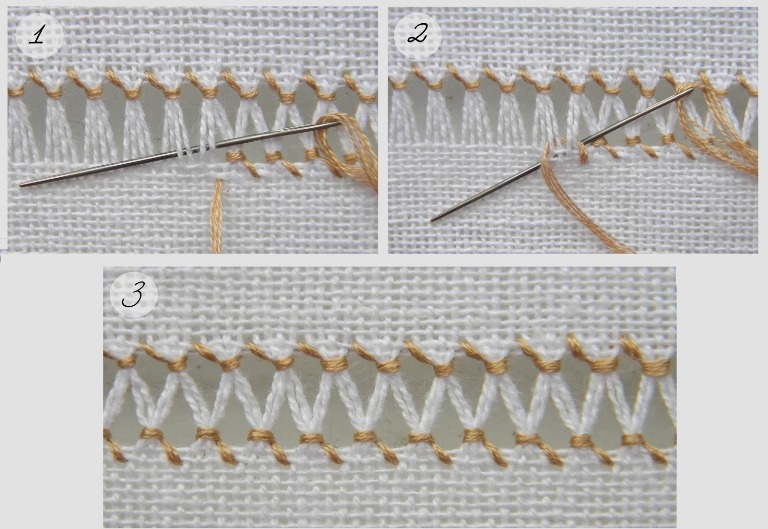
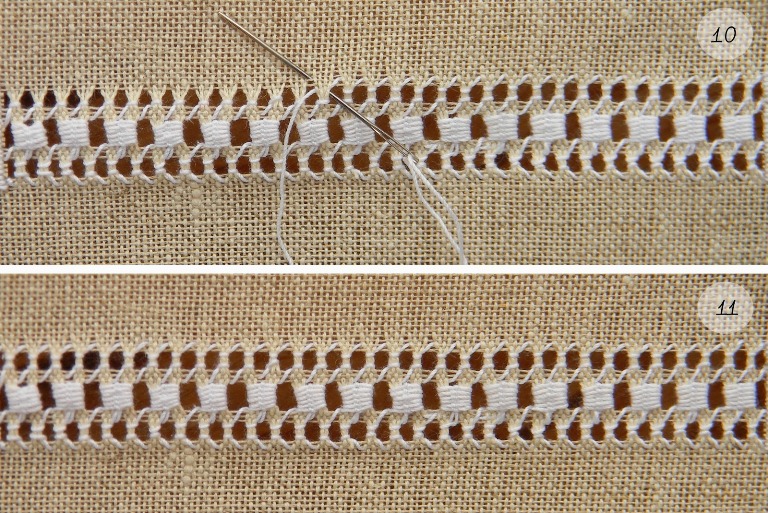
"Crossed twig" (twisted)

This is one of the varieties of double-rod embroidery, in which the rods that are next to each other are intertwined. When the double rod is made, the working thread is fixed in the middle and to the right of the rocker, and the needle is inserted under the second rod, passing over the first, and scrolling from right to left counterclockwise. The thread is pulled through the middle, twisting the columns with each other. This decorative stitch is known in various variations and degrees of complexity.
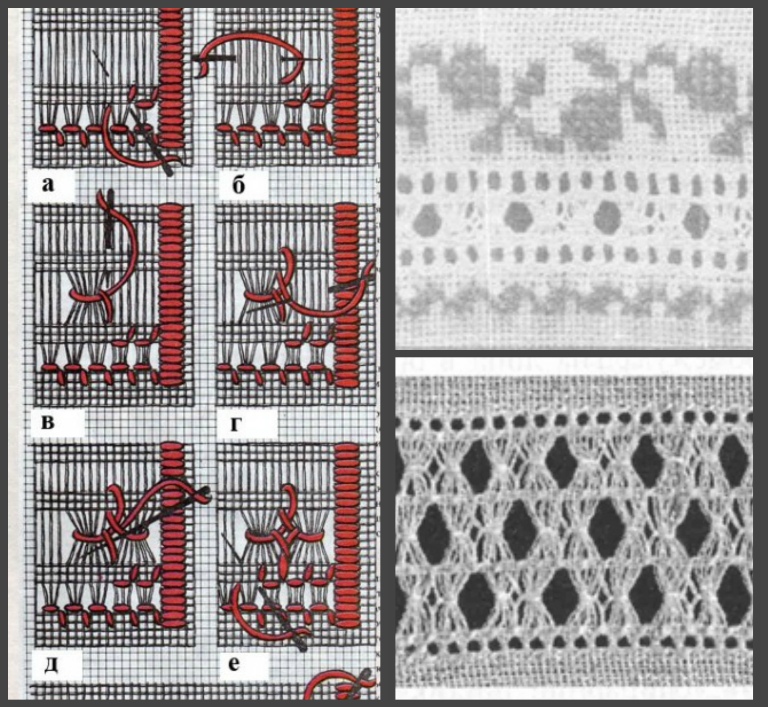
"Planking"
A wider netting, made on a ready-made netting with a double rod, with ten to twenty threads pulled out of the canvas, depending on the required width. It is embroidered with threads close to the tone of the canvas – “unbleached netting” or with colored threads – “shabak”.
3-4 pieces of twigs are connected to each other in columns, on which a pattern is laid with white or colored thread. The laying can be done in the form of squares, zigzags, diamonds. The working thread goes from right to left, typing one column on the needle and passing the other under it. In the opposite direction, we do the opposite.
"Columns"

A lace pattern that is made to complement the main ornament and is the basis for most complex lace patterns. In many regions of Ukraine, the lace pattern is sewn in columns with threads in the color of the fabric or with red threads.
When preparing fabric for embroidery with a hemstitch, the threads are pulled out alternately: three threads are pulled out, two remain, three or four are pulled out, two remain, three are pulled out. Depending on the pattern of the hemstitch, the ratio of pulled and left threads may also vary. The width of the hemstitch depends on the density of the fabric.
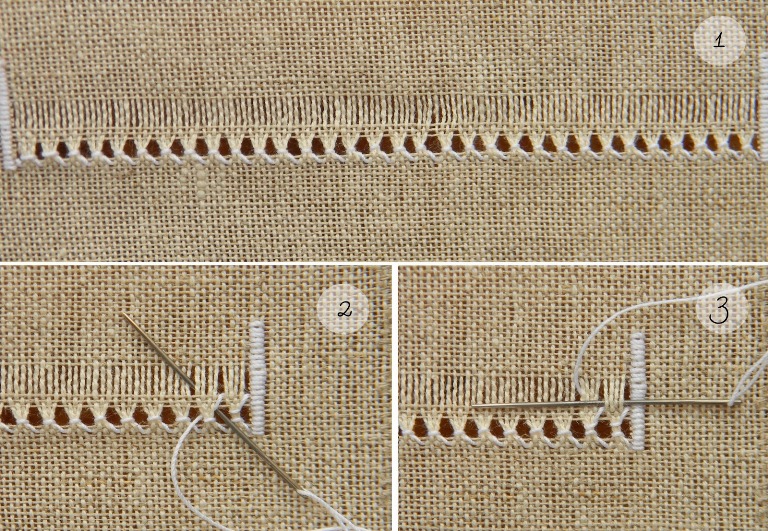
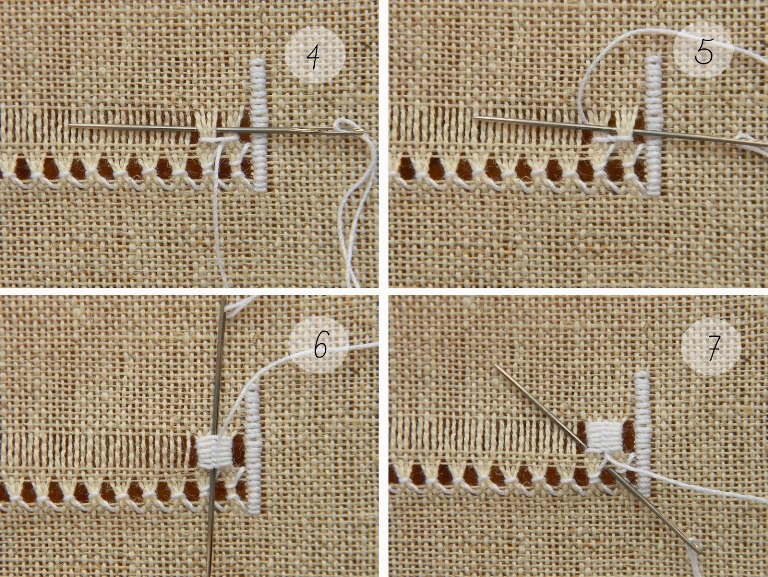
The net is embroidered in three rows: a single bar, a column, a double bar. The net embroidery begins with a single bar, the number of threads in the column should be equal to the number of drawn threads (in the example we are considering, there will be three of them). The second row of the net is done with a column: the needle is inserted near the first bar and passes behind it. The thread is pulled through and forms a deck from two bars. After that, the needle goes over the deck and comes out behind the second bar from right to left. Then the same thing is repeated until the decks reach the threads of the fabric, and the column turns out to be dense. The other columns are sewn according to the same pattern, while the number of decks on each column should be the same. In the third row, the top and bottom are embroidered with a single bar.
"Double column" (buckwheat, buckwheat)

A net that forms bands with an ornament. The sequence of pulling the threads is the same as in a regular column, but in the second row of the net, more threads are pulled (four to five).
The first row is embroidered with a single crochet. In the second row, the columns are embroidered to the middle of the row. After that, the work is turned 180 degrees so that the already sewn columns are on top. Each column is sewn from right to left, for this purpose the rocking chair and the first crochet are first grabbed. All the others divide the finished columns in half. The third row is embroidered again with a single crochet.
"Kozlyk" (pleated mesh)
A fairly common type of embroidery, it has many varieties. It is used both as an independent type of ornament and between other types of netting to complement the pattern. To perform it, ten threads are pulled out, which are first combined in bundles into columns, and then two columns together into two rows. The working thread first ties two columns together with a knot, and then goes down and ties two more columns together with a knot, combining one column from the first bundle with another from the next. All the others are performed in the same way.
"Punk" (understitching)
It is embroidered to tighten the columns between two adjacent stitches or to decorate the edge of the product.
To make a punk, five threads are pulled out twice. Between these rows, two to five threads remain unpulled, on which it will be embroidered. Tassels are made on both sides of the unpulled row, and the working thread performs a stitch from the bottom up around this row. On the back side, a diagonal stitch is made to the right side and down, and the needle is brought out to the front side through several threads of the first stitch. Then, from the beginning of the stitch, a diagonal stitch is made upwards, and the tassel is tightened.
"Bug"

This is an openwork net that is embroidered on the basis of double twigs.
The working thread is secured and wrapped around the first dowel in the middle of the netting once or twice from right to left, passing the thread under the dowel. Next, a “forward needle” stitch is performed: two dowels pass under the needle, one over the needle. All three dowels are tied together with two knots. The thread, when moving to the next dowel, is always at the bottom.
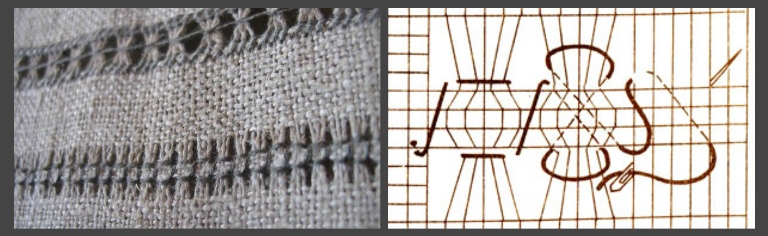
"Spider"
This type of netting is made on twigs gathered in a bundle.
First, the twigs are gathered into a pile in the shape of the letter "Z", after which, by crossing with a needle, two circles are made around the center: a twig on the needle, a twig under the needle. The transition to the next knot is made from the bottom of the previous one.
This type of netting is also used to fill in empty squares when pulling threads in a pattern in both horizontal and vertical directions. The thread is pulled diagonally from one corner to the other and in both horizontal and vertical directions. These threads are wrapped around the center in a circle, first clockwise and then counterclockwise.
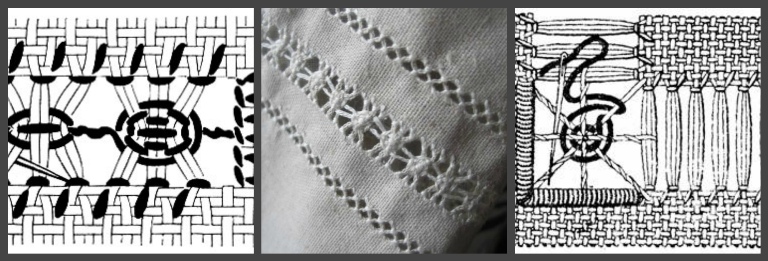
"Lyakhivka"
It is used in ornaments, most often as a boundary line and is located below and above the hem.
The lyakhivka is made on threads pulled out sequentially: first three are pulled out, the next three remain, after that a wide strip of up to ten threads is pulled out, and the pattern is repeated again – three remain, three are pulled out. Narrow nets are covered with single rods. In the central part, two rods are wrapped with the working thread, and then two others are taken under the needle from left to right – a loop is formed. Between the four rods, the threads of the fabric and the two rods on the right are captured, and everything is wrapped with the working thread. The working thread is taken onto the pulled needle, which is under two threads of the fabric. In the middle, between the rods, a rhombus (lyakhivka) is obtained. The next fragment of the pattern is created from two rods of the first lyakhivka and two other rods.
In Ukrainian products embroidered with lace, a multi-row lyakhivka is often found. The pattern is done in a checkerboard pattern.
We have introduced you to the basic techniques of traditional Ukrainian netting: from the simplest thin one to the more complex multi-row one. We hope that our tips will help you master this amazing type of embroidery and give you confidence in your work. And the creative combination of different techniques in one ornament will make your embroidered products unique.


Write a comment